How to Create & Modify Events in GA4

What happens if you need to adjust the name of an event because of a typo?
Or you need to create a new Google Analytics 4 (GA4) parameter so that you can create a new custom metric?
What’s an analyst to do?
GA4 gives you the flexibility to create and modify events within the native GA4 user interface (UI).
No need to make the adjustments in Google Tag Manager (GTM).
Of course, these options are not as versatile as those in GTM, but you can’t beat the UI method for speed and convenience.
We’re now going to walk you through the step-by-step processes of creating and modifying events. And we’ll showing you examples of each from the Google Merchandise Store’s GA4 Demo Account.
(What Demo account? Do check out our post about Google’s GA4 Demo Account)
Create Event
Create Event in GA4 allows you to create a new event based on another event.
Why might you want to do this? So you can detect more specific interactions and count as a specific event, any one of these examples:
- Outbound click to a specific third-party website
- Submission of a very important form
- Download of a very important document
- Mark any of these new events as a Conversion Event
To use this feature, you first select the source event and then specify the matching condition(s) that cause the new custom event to be created.
Let’s go through the Create Event process step-by-step.
- Start by going to the Admin section at the bottom left corner by clicking on the gear icon. Next,
- Under Property settings,
- Select Events…
- and then Create event.
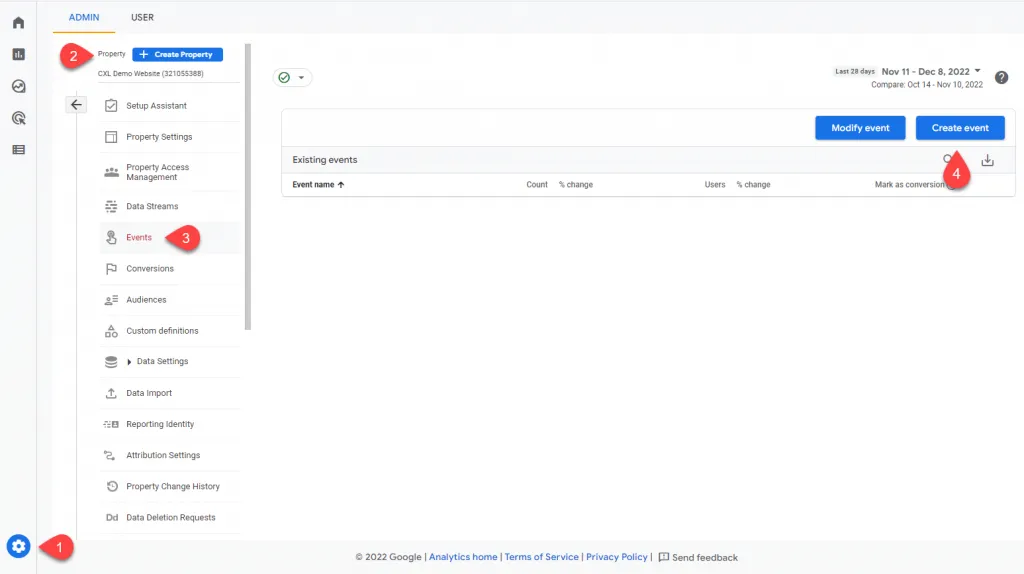
2. The Custom events menu will pop up. All previously created custom events are listed along with their matching conditions here. This menu will be empty if there are no existing custom events. Click on ‘Create’ at the top right corner to begin creating a custom event.

3. Now you should see the Configuration. Here, you can enter your custom event name and matching condition(s). Click on ‘Add condition’ to add more matching conditions. The ‘Copy parameters from the source event’ check box allows your new event to inherit all parameters of the source event. You may also add new parameters by clicking on ‘Add modification’ at the bottom of the menu.
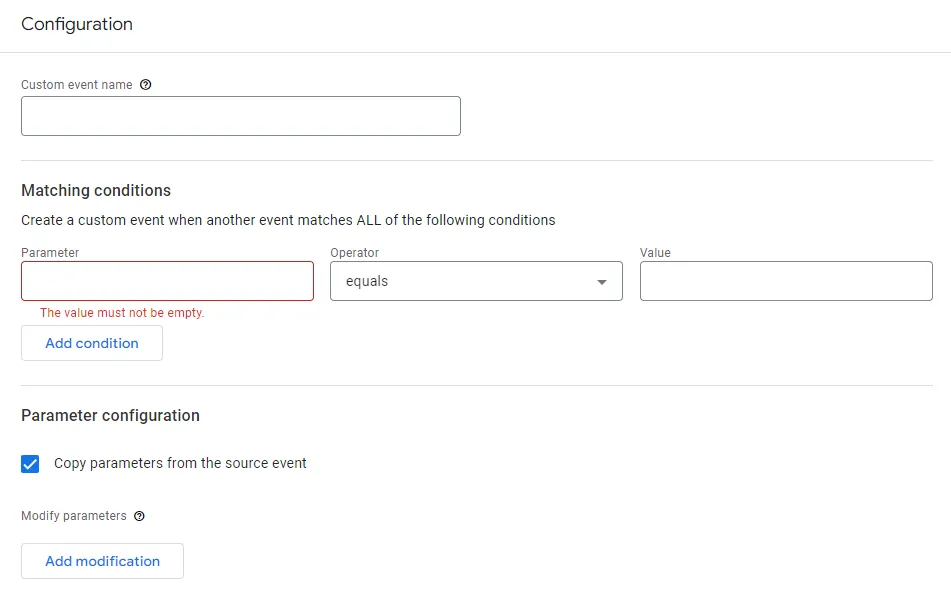
- Click on ‘Create’ at the top right corner to save your new custom event.
Create Event Examples from the GA4 Demo Account
Now let’s look at two examples from the Google Merchandise Store Demo Account.
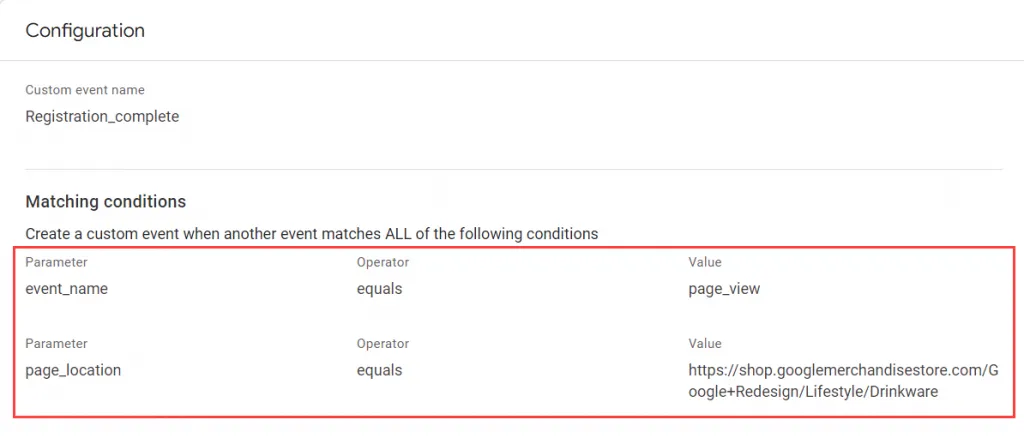
The ‘Registration_complete’ custom event is created with matching conditions so that it is triggered when a page_view event is fired AND the page location parameters equal this specified page URL.
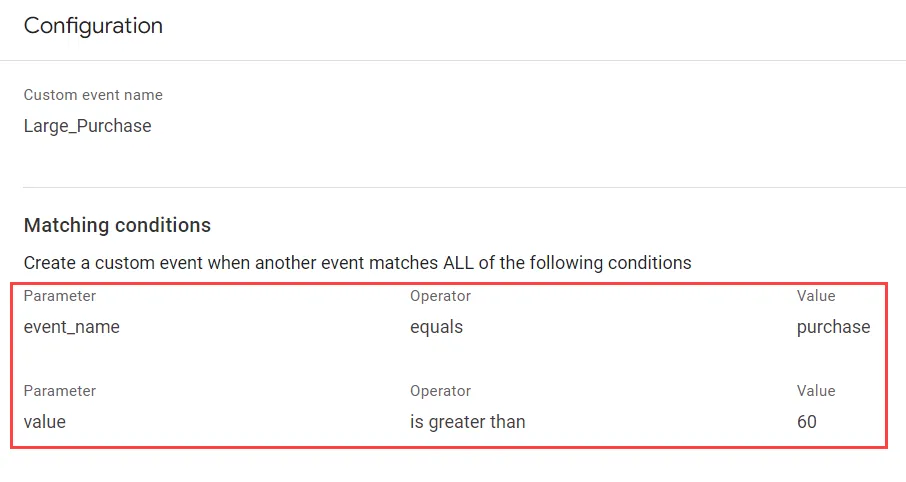
On the other hand, the ‘Large_Purchase’ custom event is triggered when a purchase event is fired AND the value parameter has a value greater than 60.
Having created new events Registration_complete and Large_Purchase, Google Merchandise Store analysts can now:
- Mark either of these as Conversion Events
- Create trends or exploration reports using these new events without having to filter the source event
Modify Event
Using Modify Event, you can edit existing events to:
- Change event names
- Change parameter names
- Add parameters
- Delete parameters
Adding new parameters is especially useful for creating custom metrics within the GA4 user interface.
Let’s go through the step-by-step process of Modify Event.
1. Modify Event can be found in the same place as Create Event under Admin > Property > Events > Modify even
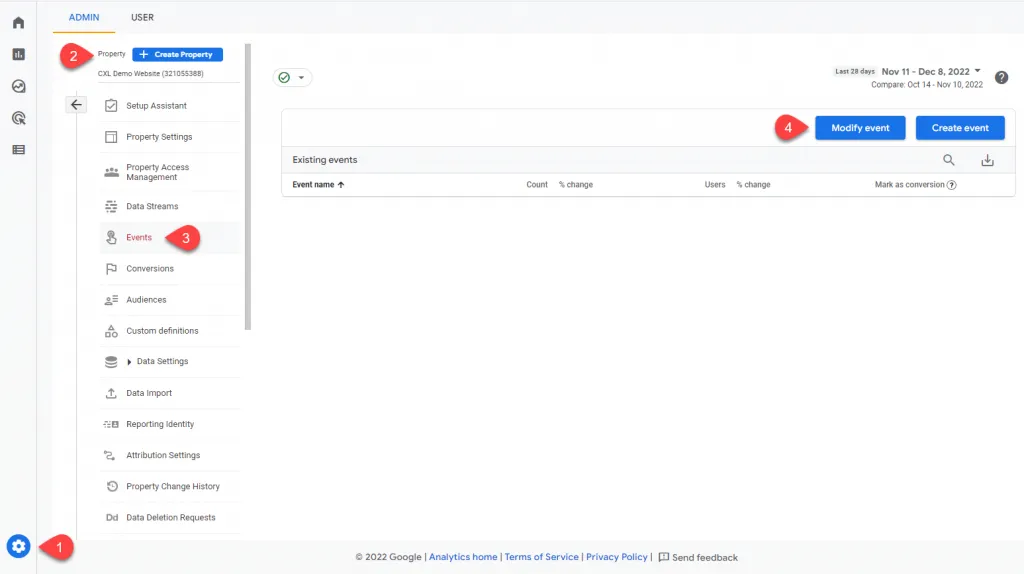
2. The Event modifications menu will pop up. Just like creating events, existing event modifications are listed here. Click on ‘Create’ at the top right corner to begin an event modification.

3. In the Configuration menu, enter your modification name and specify matching conditions. After that, in the ‘Modify parameters’ section, you can modify event parameters, including your event name.
- To add a new parameter, enter the parameter name under ‘Parameter’ and the value under ‘New Value.’
- To remove a parameter, enter the parameter name under ‘Parameter’ and leave the ‘New Value’ field blank.
You can also add extra matching conditions and modifications with the ‘Add conditions’ and ‘Add modifications’ options in the menu.
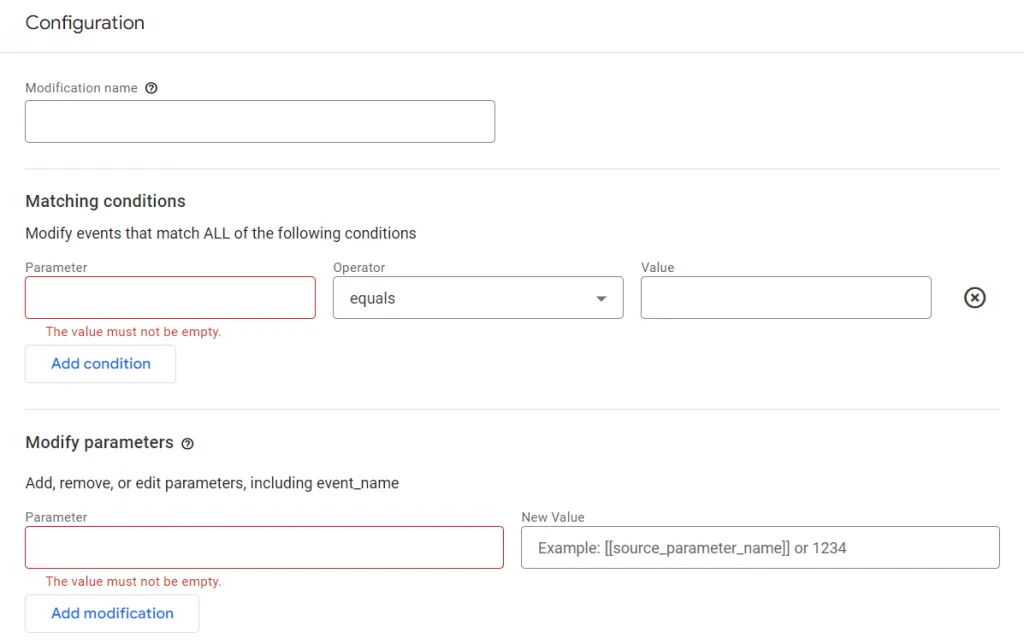
- Click on ‘Create’ at the top right corner to save your event modification.
Modify Event Example from the GA4 Demo Account
Now let’s look at an example from the Google Merchandise Store Demo Account.
The ‘Alter addtocart’ modification changes the name of the ‘addtocart’ event to ‘add_to_cart.’ The original event name has no spaces and no underscores, but this modification changes the event name into a format known as snake case, which has better readability and format consistency.
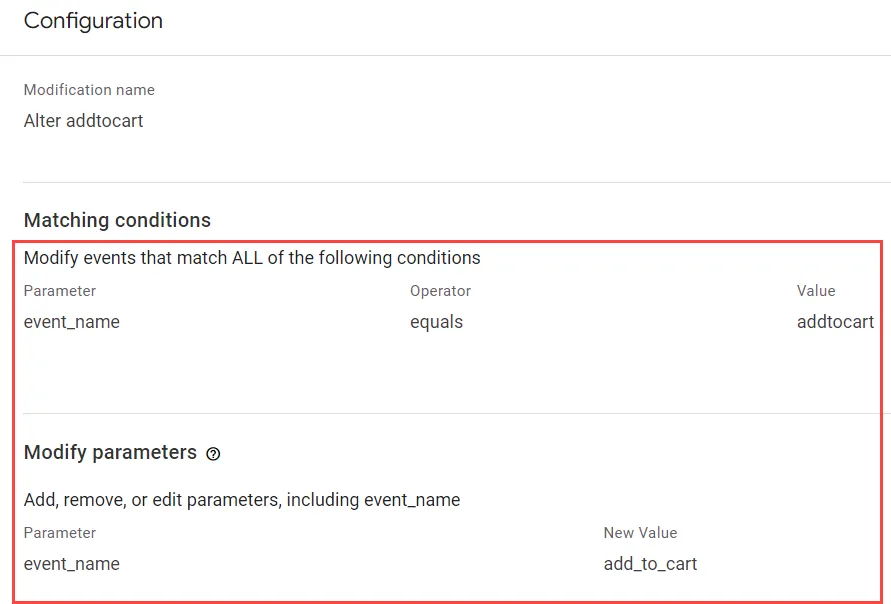
As you can see, the Create Event and Modify Event features let you quickly and conveniently configure and edit your events directly within the GA4 interface, without needing to make the change in tag management platforms such as Google Tag Manager.
Got questions? Drop us a comment, or describe your biggest challenge or frustration.
Other posts in our 12 Days of Google Analytics 4 series:
1.GA4 “Configure” is Moving to Admin
2.How to Set Up Cross-Domain Tracking in Google Analytics 4
3.Get Your Hands on Real GA4 Data Today with the Google Analytics 4 Demo Account
4.What is Engagement Time in GA4?
5.Why your GA4 Looker Studio Report is Broken
6.Did your Looker Studio GA4 Numbers Increase After Applying Filters?
7.How is Engagement Time Reported in GA4?
8.How Ecommerce Tracking in GA4 is Different from UA
9.How to Create and Modify Events in GA4
10.When to Use GA4 Rollups & Subproperties
11.What in GA4 replaces Universal Analytics’ Views? Hint: It’s NOT GA4 Data Streams
12.Why am I seeing blank rows or (not set) in my GA4 Landing Page Report?
By Lwin Phyo Aung | December 13, 2022
